


Before we get much further in this project, we should set up command line builds while things are still simple. It’s easier to enhance the builds step by step as required than to configure a complex build system in one go.
If you’re a regular reader, you’ll know that I very much like the psake build orchestration tool. In fact, I wrote an entire series on psake build scripts that went into quite a lot of detail.
Introduction to psake
As a quick refresher, psake is a build orchestration tool. You break up your build into a set of tasks, each task carrying out one required step. Each step declares its dependencies - other tasks that must execute first. When you run a build, the psake engine reads in all the tasks, inspects the dependencies and runs all the required tasks in the right order.
For example, the Compile task listed below specifies a dependency on the task Requires.DotNetExe. This task locates the dotnet executable and aborts the build with an actionable error message if it can’t be found.
Task Requires.DotNetExe {
    $script:dotnetExe = (get-command dotnet -ErrorAction SilentlyContinue).Path

    if ($dotnetExe -eq $null) {
        $script:dotnetExe =
            resolve-path $env:ProgramFiles\dotnet\dotnet.exe `
                -ErrorAction SilentlyContinue
    }

    if ($dotnetExe -eq $null) {
        throw "Failed to find dotnet.exe"
    }

    Write-Output "Dotnet executable: $dotnetExe"
}
The task first looks on the PATH to find the dotnet command; if it’s not found that way, it falls back to a hard coded location that reflects the most common (i.e. default) installation folder. If that still doesn’t work, an error is thrown to abort the build.
To learn more about psake, see the introduction to psake series that I wrote back in the second half of 2017.
Kicking off the build
To kick off the build, we need a simple triggering script, located in the root folder of our project.
. .\scripts\bootstrap.ps1
invoke-psake -buildFile .\scripts\psake-build.ps1 -taskList Integration.Build
As described in Bootstrapping a psake build, the script .\scripts\bootstrap.ps1 ensures that psake is available for use and will abort the build if it can’t be found.
Once psake is available, the invoke-psake command is used to run the actual build. All of the available tasks are defined in .\scripts\psake-build.ps1, including our initial target Integration.Build
Task Integration.Build -Depends Clean.BuildDir, `
    Clean.SourceDir, Compile, Unit.Tests, Coverage.Report
This breaks our build down into a series of steps as discussed below.
Clean.BuildDir
To ensure that we don’t have any debris left around from prior builds, we first clean our build output folder.
Task Clean.BuildDir {

    $script:buildDir = join-path $baseDir "build"

    Write-Host "Build output folder: $buildDir"

    if (test-path $buildDir) {
        remove-item $buildDir -recurse -force -ErrorAction SilentlyContinue
    }

    mkdir $buildDir -ErrorAction SilentlyContinue | Out-Null
}
This works by trying to delete the entire folder, and then creating a new one.
Clean.SourceDir
I’m not interested in our build scripts doing incremental builds. Instead, I want to ensure that everything is compiled from scratch each time. So, I want to ensure that all of the intermediate results generated by prior builds are removed.
Task Clean.SourceFolder {

    Write-Info "Cleaning $srcDir"
    remove-item $srcDir\*\bin\* -recurse -ErrorAction SilentlyContinue
    remove-item $srcDir\*\obj\* -recurse -ErrorAction SilentlyContinue
    remove-item $srcDir\*\publish\* -recurse -ErrorAction SilentlyContinue

    Write-Info "Cleaning $testsDir"
    remove-item $testsDir\*\bin\* -recurse -ErrorAction SilentlyContinue
    remove-item $testsDir\*\obj\* -recurse -ErrorAction SilentlyContinue
    remove-item $testsDir\*\publish\* -recurse -ErrorAction SilentlyContinue
}
Compile
To build the source code itself, we need to first find the dotnet executable. To keep our tasks small and easy to understand, we separate finding dotnet.exe into a task of its own, as shown above.
The actual compilation task is fairly straightforward:
Task Compile -Depends Requires.DotNetExe {

    $solution = resolve-path $baseDir\*.sln
    Write-Info "Solution is $solution"
    Write-Host

    & $dotNetExe build $solution
}
Unit.Tests
To run all the unit tests, we look recursively for all our projects under src/tests and run each of them in turn.
Task Unit.Tests -Depends Requires.DotNetExe, Compile {

    foreach ($project in (resolve-path $testsDir\*\*.csproj)) {
        $projectName = (get-item $project).BaseName
        Write-SubtaskName $projectName
        exec {
            & $dotnetExe test $project `
                /p:CollectCoverage=true `
                /p:CoverletOutputFormat=opencover `
                /p:Exclude="[xunit*]*%2c[*.Tests]*"
        }
    }
}
Notice the three additional parameters included at the end of the dotnet command. These are used to configure coverlet to generate code coverage statistics. I’ve used (and blogged about) OpenCover in the past, but it doesn’t support .NET Core, so I’ve switched to coverlet for this project.
The first parameter (/p:CollectCoverage=true) turns on collection of coverage data. Coverlet integrates directly into the MSBuild scripts, so it’s really easy to use.
The second parameter (/p:CoverletOutputFormat=opencover) specifies that the output file should be in OpenCover format. We need this for the report generation tool discussed below.
The third parameter (/p:Exclude="[xunit*]*%2c[*.Tests]*") is currently neeeded to make it work. Seems there is a bug in the v2.60 release for which this is a good workaround. I expect this bug will go away pretty quickly, given that Coverlet is in active development. When it does, we should be able to delete this parameter.
Coverage.Report
To generate reports detailing code coverage, let’s return to ReportGenerator. Since I last blogged on the use of ReportGenerator, things have changed in the world of NuGet and packages are no longer stored in a ./packages/ subfolder of the project.
For our build to find ReportGenerator.exe, we now need to scan NuGet’s global package caches and search for the latest available package.
Task Requires.ReportGenerator -Depends Requires.DotNetExe {

    $toNatural = { [regex]::Replace($_, '\d+', { $args[0].Value.PadLeft(20) }) }

    # dotnet returns a list of the form "info : label : folder"
    # So we strip "info : " from the start of each line
    Write-Output "[-] Finding NuGet caches via dotnet.exe"
    $locals = & $dotnetExe nuget locals all --list | % { $_.SubString(7) }

    foreach($local in $locals)
    {
        $index = $local.IndexOf(":")
        $folder = $local.Substring($index + 1).Trim()

        $exePath = `
            get-childitem $folder\reportgenerator\*\ReportGenerator.exe `
                -ErrorAction SilentlyContinue -Recurse `
            | Sort-Object $toNatural | select-object -last 1

        if ($exePath -ne $null)
        {
            Write-Output "[+] ReportGenerator found at $exePath"
            $script:reportGeneratorExe = $exePath
            break
        }
        else
        {
            Write-Output "[x] ReportGenerator not found within $folder"
        }
    }

    if ($reportGeneratorExe -eq $null)
    {
        throw "Failed to find ReportGenerator.exe"
    }
}
This is largely similar to the way the bootstrap.ps1 script searches for psake when we first trigger a build. We use dotnet to list all the package cache directories, and then search each one in turn for the executable we desire. As a tiebreaker in the case of multiple matches, we choose the latest available version.
With that complete, we do the actual report generation:
Task Coverage.Report -Depends Requires.ReportGenerator, `
Clean.CoverageReportDir, Unit.Tests {
exec {
& $reportGeneratorExe `
-reports:$testsDir\*\*.opencover.xml `
-targetdir:$coverageReportDir
}
$openCoverIndex = resolve-path $coverageReportDir\index.htm
& $openCoverIndex
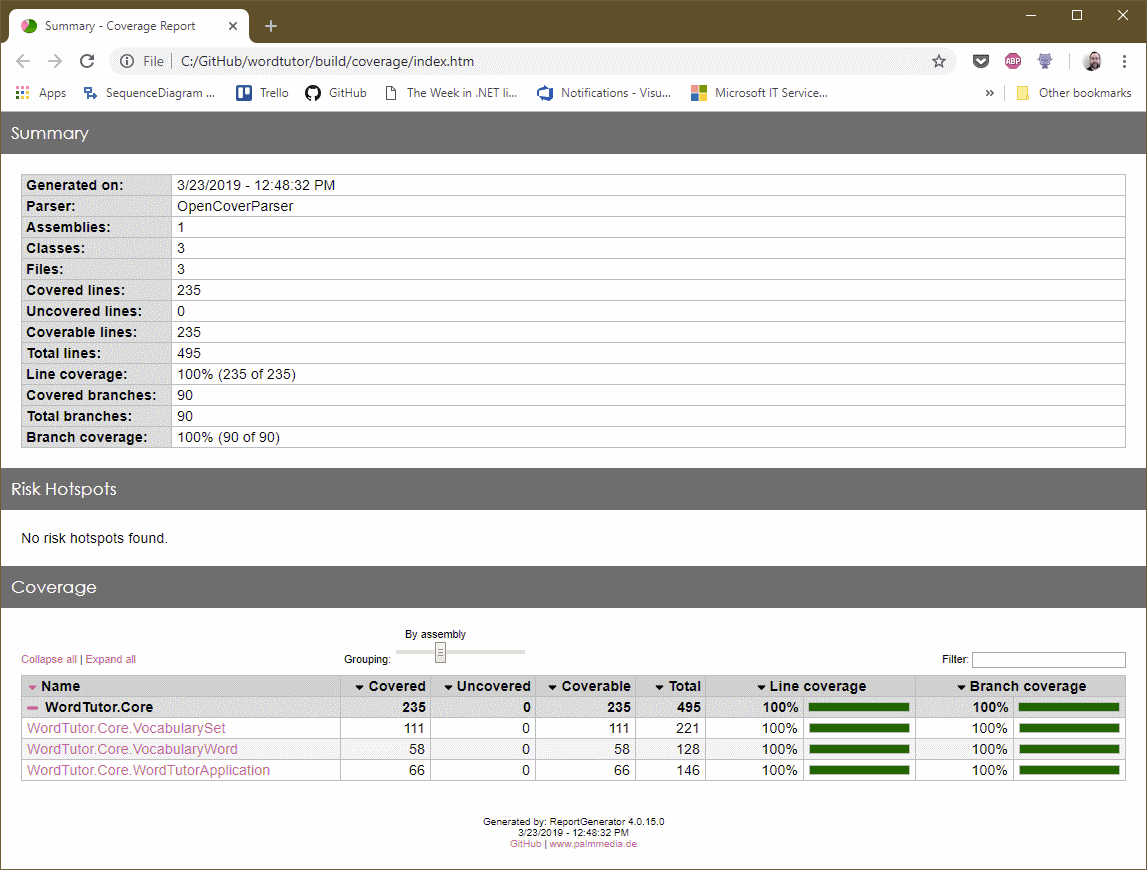
}You’ll observe that we open the coverage report at the end; this makes sense for now, but will need to be changed when we start automating our builds. For now, however, it’s useful to see the coverage report every time we run the script:
Comments
blog comments powered by Disqus