After exploring last time how to remove an item from a queue, let’s look at the slightly more complex case of adding items.
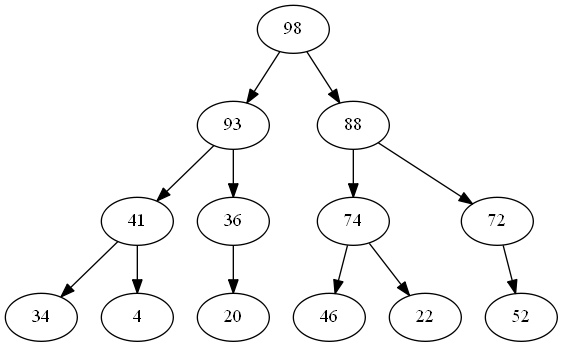
Let’s start with a moderately sized queue, similar to the one we’ve see before:

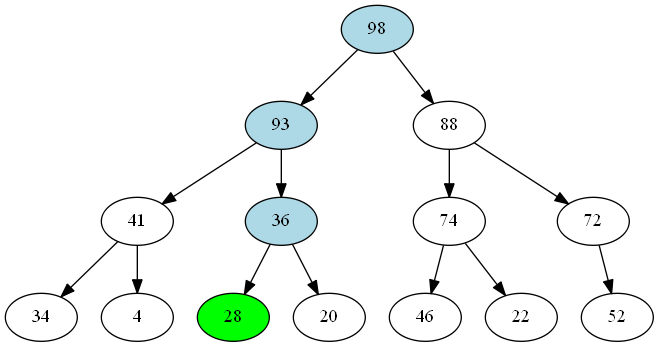
To enqueue a 28 into the queue, we start at the root of the tree and work our way down:
- 28 < 98, so we keep 98 as the root of the tree.
- Since both branches under 98 have the same count, we move down to the left hand branch
- 28 < 93, so we keep 93 as the root of the subtree.
- The lefthand branch has three nodes and the righthand two, so we move to the right.
- 28 < 36, so we keep 36 as the root of the subtree.
- We add 28 as a child of 36; since 28 > 20, it goes on the left.

Again, as we’re creating an immutable tree, we don’t modify any existing nodes - instead we create entirely new nodes as required. These are highlighted in the diagram.
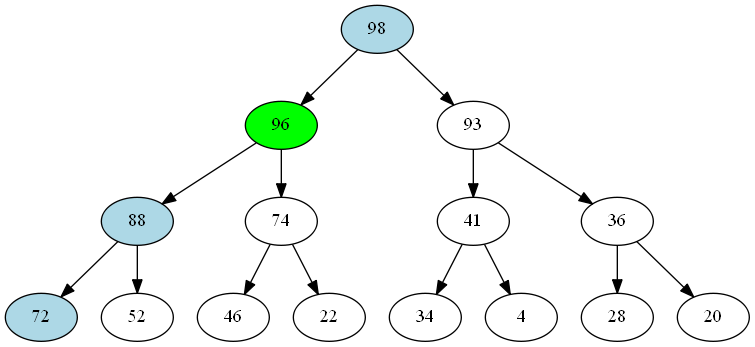
Now, let’s add the value 96 - this is a little more complex because the new value doesn’t end up at the bottom of the tree:
- Starting at the root, 96 < 98, so we leave the root value unchanged.
- The lefthand subtree has seven nodes, and the righthand six, so we move into the 88 subtree on the right.
- We see that 96 > 88, so we leave the 96 here and take the 88.
- The lefthand subtree has three nodes and the righthand two, so we move into the 72 subtree on the right.
- 88 > 72, so we leave the 88 here and add the 72 as a child node on the left.
- Because 88 is greater than 74, we swap the two branhes so that 88 goes on the left.
- Finally, because 96 > 93, we also swap those two branches, putting 96 on the left.

In summary, to insert each value, we start at the root of our tree and work our way down to a node where we can add a new leaf. As we go, we pay attention to our invariant requiring the larger value to be at the root of each subtree. Sometimes we decide the value we’re inserting should be the head of the subtree and we take the old head down into one of the branches.
The implementation of this is surprisingly simple:
public IImmutablePriorityQueue<T> Enqueue(T value)
{
    T head;
    T toEnqueue;
    if (_comparer(Head, value) <= 0)
    {
        head = Head;
        toEnqueue = value;
    }
    else
    {
        head = value;
        toEnqueue = Head;
    }
We start by comparing the value we’re enqueing with the current head - we keep one of those values as our new head of the tree, and the other to enqueue into one of our subtrees.
We choose which subtree based on the count of items, preferring the smaller branch, recursively pushing the value of toEnqueue into that subtree. If there’s a tie in size, we prefer the lefthand branch.
    if ( _left.Count <= _right.Count)
    {
        // Add the item into the lefthand subtree
        return new BranchingImmutablePriorityQueue<T>(
            head,
            _left.Enqueue(toEnqueue),
            _right,
            _comparer);
    }

    // Otherwise we add the item into the righthand subtree
    return new BranchingImmutablePriorityQueue<T>(
        head,
        _left,
        _right.Enqueue(toEnqueue),
        _comparer);
}
Having explored how to enqueue and dequeue items from an existing non-trivial priority queue, next time we’ll look at how we start from an empty priority queue and build up from there.


Comments
blog comments powered by Disqus